.webp)


Most listing photos look the same. Bright skies, clean rooms, white walls. Twilight photography breaks that pattern. Shoot the right home at the right moment and you get windows that glow, a sky that shifts from orange to deep blue, and an exterior that looks like it belongs in a design magazine rather than an MLS grid. That impression sticks.
This guide covers everything for both photographers booking twilight shoots and agents deciding whether to order one. Camera settings, timing, pricing, virtual twilight as an alternative, and how to extend the value of your shots with a listing video. Start with the real estate photography tips guide if you want a broader foundation first.
What Is Twilight Real Estate Photography?
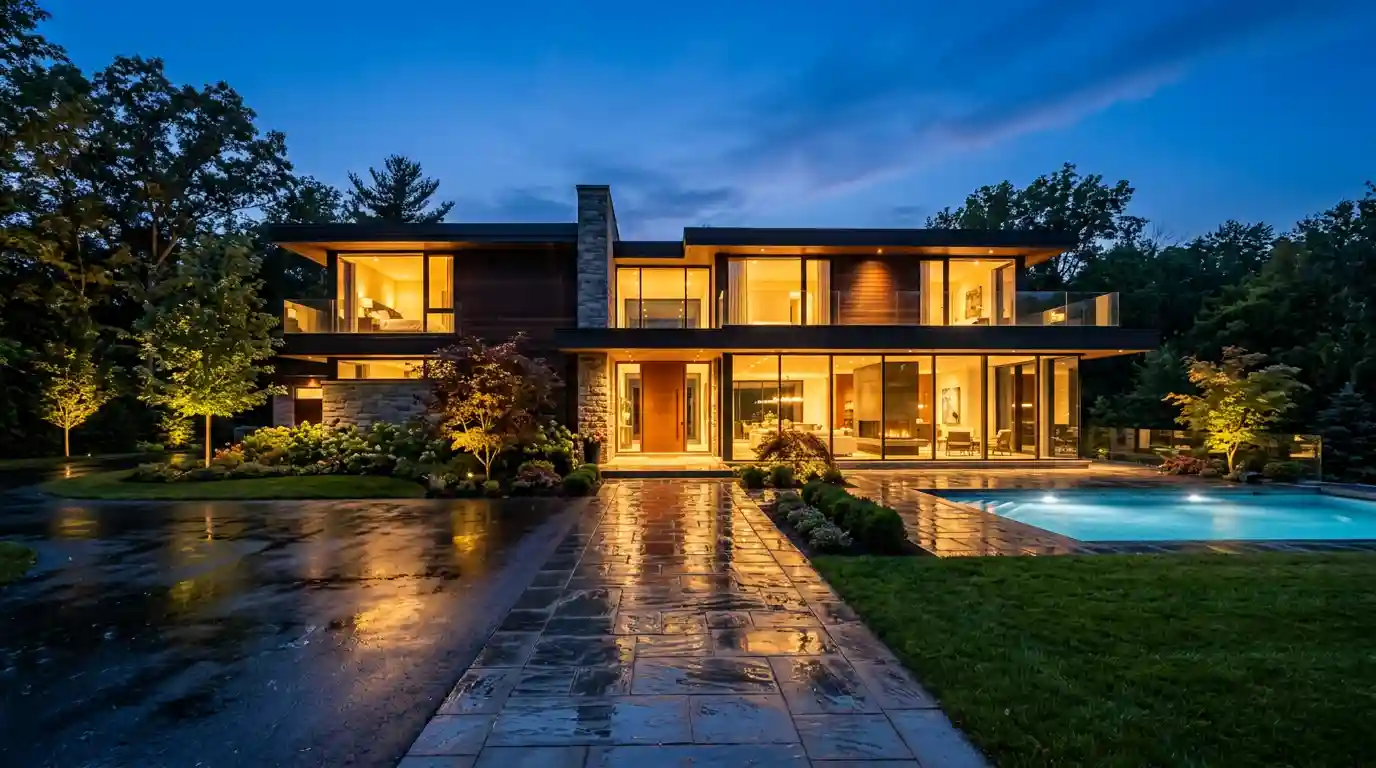
Twilight real estate photography captures properties during the brief window just before and after sunset, known as the blue hour or golden hour. The sun is below the horizon but the sky still carries light. Interior lights are on. The result is a warm-cool contrast: glowing windows against a deep blue sky that creates a feeling of warmth, luxury, and livability that midday shots rarely achieve.
The window is short. Most photographers work with 20 to 30 minutes total. That time pressure is exactly what makes the technique distinctive. You cannot fake a real sky, and every shot has to count.
Are Twilight Photos Worth It?
For the right property, yes. A well-executed twilight shot can make a $500,000 home look like a million-dollar listing, which attracts higher-intent buyers and supports a stronger asking price.
Twilight works best on homes where the exterior architecture is strong, where there is outdoor lighting (path lights, pool lighting, porch fixtures), and where the neighborhood setting benefits from an atmospheric sky. For a basic three-bedroom with no outdoor lighting and a flat front facade, the results are usually unremarkable. For a home with a stone facade, lit landscaping, and a covered porch, twilight transforms the whole presentation.
Agents who regularly use twilight shots tend to reserve them for listings at $400,000 and up, or for any property where the exterior is a genuine selling point.
When to Shoot: The Twilight Window
Timing is the single biggest variable in twilight photography. Arrive too early and the sky is too bright. Arrive too late and the ambient light is gone, leaving you with dark sky and blown-out windows.
The ideal time to shoot is 10 to 30 minutes after sunset. The sweet spot for most properties is around 20 minutes post-sunset: the sky holds enough blue tone to create contrast, and interior lights glow without overexposing. Use an app like PhotoPills or the Golden Hour app to find the exact sunset time at the shoot location, and plan to be set up before sunset so you can start shooting the moment conditions are right.
Scout the property during daylight before the shoot. Walk the exterior and identify your best angles. Confirm which lights to turn on and whether any fixtures need bulbs replaced. The goal is to arrive at dusk with zero decisions left unmade, so you can spend the entire window shooting.
Camera Settings for Twilight Real Estate Photography
Twilight is low light. That means slower shutter speeds, a tripod, and careful exposure decisions. The following settings work as a starting point and should be adjusted based on the specific light at each property.
| Setting | Recommended Value | Why It Matters |
|---|---|---|
| Aperture | f/8 to f/11 | Maximizes sharpness across the full scene |
| ISO | 100 to 400 | Keeps noise low; raise only if shutter exceeds 30 seconds |
| Shutter Speed | 1 to 30 seconds | Adjust to available light; bracket across multiple exposures |
| White Balance | Custom or shoot RAW | Mixed warm and cool light requires post-processing to balance |
| File Format | RAW | Essential for color correction and HDR blending in post |
| Focus Mode | Manual | Autofocus struggles in low light; lock focus on the main architectural detail |
Shoot in RAW format. The mixed lighting at twilight creates color balance challenges that RAW files handle far better than JPEGs. You will want the editing latitude in post.
Bracket your exposures. Shoot at three to five different shutter speeds (for example, two stops under, one stop under, metered, one stop over, two stops over) and blend the results. This captures detail in both the bright windows and the darker sky, which a single exposure cannot do. Most high-end twilight shots are composites, not single frames.
For a full breakdown of gear recommendations, see the real estate photography equipment guide.
Twilight Shoot Checklist: Before You Press the Shutter
Preparation separates a good twilight shoot from a great one. Run through this checklist before every session.
- Turn on every interior light: overhead fixtures, lamps, kitchen under-cabinet lighting, and accent fixtures
- Turn on all exterior lights: porch lights, path lights, pool or spa lighting, and landscape uplighting
- Remove cars from the driveway and clear the front of the property
- Stage outdoor furniture: patio table, chairs, and a fire pit or water feature if available
- Set your tripod positions during daylight so you know exactly where to stand when the window opens
- Check battery charge and memory card space before you leave for the shoot
- Scout the property to identify any broken bulbs, missing fixtures, or obstructions to clear
Post-Processing Twilight Real Estate Photos
Twilight editing has two main challenges: balancing color temperatures and managing exposure across a wide dynamic range.
Interior lights are typically warm, around 2700K to 3000K. The blue hour sky is cool, around 8000K to 12000K. A single white balance setting satisfies neither. The fix is to blend exposures, set a neutral white balance, and then adjust individual areas: warm the interior slightly, cool the sky slightly, and aim for a result that looks natural rather than heavily processed. Overly orange windows or a neon blue sky both signal to buyers that the image is manipulated.
Use Lightroom or Photoshop for HDR merging and selective adjustments. Pay attention to window brightness. Slightly glowing windows read as inviting. Blown-out white rectangles read as amateur. If windows are overexposed even in your darkest bracket, use a luminosity mask or manual selection to bring the detail back.
Avoid over-sharpening the sky, which amplifies noise. Keep noise reduction moderate in sky areas and apply sharpening only to architectural details.
Virtual Twilight Photography: The AI Alternative
Virtual twilight photography converts a daytime exterior photo into a twilight image through AI editing. The process adds a blue-hour sky, illuminates windows, and shifts the overall tone to match what the scene would look like at dusk, all from a photo taken in full daylight.
The main advantage is cost and logistics. An actual twilight shoot requires the photographer to return to the property at a specific time, coordinate with the agent or seller, and work within a narrow 20-minute window. Virtual twilight requires none of that. Most editing services deliver virtual twilight images for $5 to $20 per photo and turn them around within 24 hours.
The tradeoff is realism. A well-done virtual twilight image looks close to the real thing. A poorly done one looks obviously artificial: sky gradients that do not match the light direction, windows glowing in the wrong color temperature, or landscaping that does not respond correctly to the simulated light. Virtual twilight works well for mid-range listings that need the visual impact of a twilight shot without the premium budget or scheduling constraints. For high-end listings where the exterior is a core selling point, an actual twilight shoot still delivers a more convincing result.
Twilight Photography Pricing: What to Expect
For photographers, twilight is almost always an add-on to a standard photo package rather than a standalone session. The pricing reflects the additional travel time, since most photographers cannot shoot twilight and standard interiors in the same visit, and the shorter, higher-pressure shooting window.
Twilight add-on pricing typically ranges from $75 to $200 depending on the market, with luxury markets like New York, Los Angeles, and Miami at the higher end. Some photographers charge a separate session fee for a return visit; others build twilight into a premium package tier. For a full breakdown of what real estate photography services cost by market and package type, the real estate photography pricing guide has detailed ranges.
For agents, the question is ROI. On a $600,000 listing where the exterior is a genuine selling point, a $150 twilight add-on is easy to justify. On a $220,000 townhouse with no outdoor lighting and a parking-lot view, it is harder to make the case.
How to Turn Twilight Photos Into a Listing Video
Still photos are the starting point, not the finish line. Twilight shots that sit only in an MLS gallery are underused. The same images can become a listing video that runs on Instagram, plays at an open house, and gets shared by buyers who fall in love with the property before they ever walk through the door.
Amplifiles converts listing photos, including twilight shots, into professional 1080p marketing videos in about 5 minutes at $1.50 per image, making it easy for agents to extend the value of a twilight shoot beyond static listing photos. Upload your best twilight exterior alongside interior shots, choose a voice-over, and Amplifiles sequences everything into a cinematic walkthrough video with captions and branding included.
Photographers who use Amplifiles can bundle twilight photo packages with a listing video, turning a single shoot into two deliverables without any additional filming. That combination gives agents a clear reason to upgrade from a standard photo package and gives photographers a higher-value offering without more time on location.
Unlike generic video tools that require manual editing, Amplifiles is built specifically for real estate listing videos from photos. There is no timeline to manage and no editing skills required. See real estate video examples to get a sense of what a finished listing video looks like, or read about how drone and aerial photography can complement twilight shots for exterior-focused listings.
Frequently Asked Questions
How do you do twilight real estate photography?
Arrive before sunset, set up your tripod positions, and turn on every interior and exterior light. Begin shooting 10 to 15 minutes before sunset and work through the blue hour, which typically lasts 20 to 30 minutes. Shoot in RAW and bracket your exposures at multiple shutter speeds. In post-processing, blend the best exposures and balance the warm interior light against the cool blue sky to create a natural-looking result.
What is the best time for twilight real estate photos?
The best results typically come 15 to 25 minutes after sunset, when the sky retains a deep blue tone and interior lights glow without overexposing. Use a sun-tracking app like PhotoPills to find the exact sunset time at your shoot location and plan to start shooting immediately after the sun drops below the horizon.
Are twilight photos worth it for real estate listings?
For the right property, yes. Homes with strong exterior architecture, outdoor lighting, and asking prices above $400,000 benefit most from twilight photography. The atmospheric quality of a well-shot twilight image attracts more attention online and can support a premium perception that helps justify a higher asking price. For properties with limited exterior features or no outdoor lighting, the results are less dramatic.
What is virtual twilight photography?
Virtual twilight photography uses AI editing to transform a daytime exterior photo into a dusk or blue-hour image. A blue sky replaces the original, windows are lit to simulate interior lighting, and the overall tone is shifted to match a twilight scene. It is a cost-effective alternative to an actual twilight shoot, with most services charging $5 to $20 per image and delivering within 24 hours. Results are best for mid-range listings where budget or scheduling makes a return visit impractical.
How much does twilight real estate photography cost?
Most photographers charge $75 to $200 as a twilight add-on to a standard photo package, with higher pricing in luxury markets or when a separate return visit is required. Virtual twilight editing is significantly cheaper at $5 to $20 per image and eliminates the need to schedule a second shoot.
Can twilight photos be used in a listing video?
Yes, and they make excellent video content. A twilight exterior shot as the opening or closing frame of a listing video creates a strong first and last impression. Amplifiles can sequence twilight shots alongside interior photos to produce a complete 1080p listing video with voice-over, captions, and branding in about 5 minutes at $1.50 per image.
Final Thoughts
Twilight photography is not for every listing. But for a home where the exterior architecture is the story, a well-timed blue-hour shoot is one of the highest-impact investments in the marketing budget. The window is short, the preparation is specific, and the results are difficult to replicate any other way.
We built Amplifiles because real estate agents and photographers deserve a faster path from photos to video without a production crew or editing skills. Our platform turns listing photos into professional 1080p marketing videos in about 5 minutes, with voice-overs, captions, and branding included.
Browse real estate video examples to see what a delivered listing video looks like before creating one. Or jump straight to how Amplifiles works for photographers and start with your 1,200 free credits.