.webp)


Real estate drone photography is one of the fastest ways to make a listing stand out. Listings with aerial imagery sell 68% faster than those without, according to MLS data. Tools like Amplifiles let you turn those aerial photos into polished listing videos in under five minutes, without hiring a videographer or learning editing software.
This guide covers everything you need to know about real estate drone photography and video in 2026: FAA requirements, costs, equipment choices, and how to convert your aerial shots into marketing content that actually moves listings. Whether you shoot your own drone footage or hire a pilot, you will walk away with a clear plan to add aerial content to your AI real estate video marketing strategy.
Why Drone Photography Sells Listings Faster
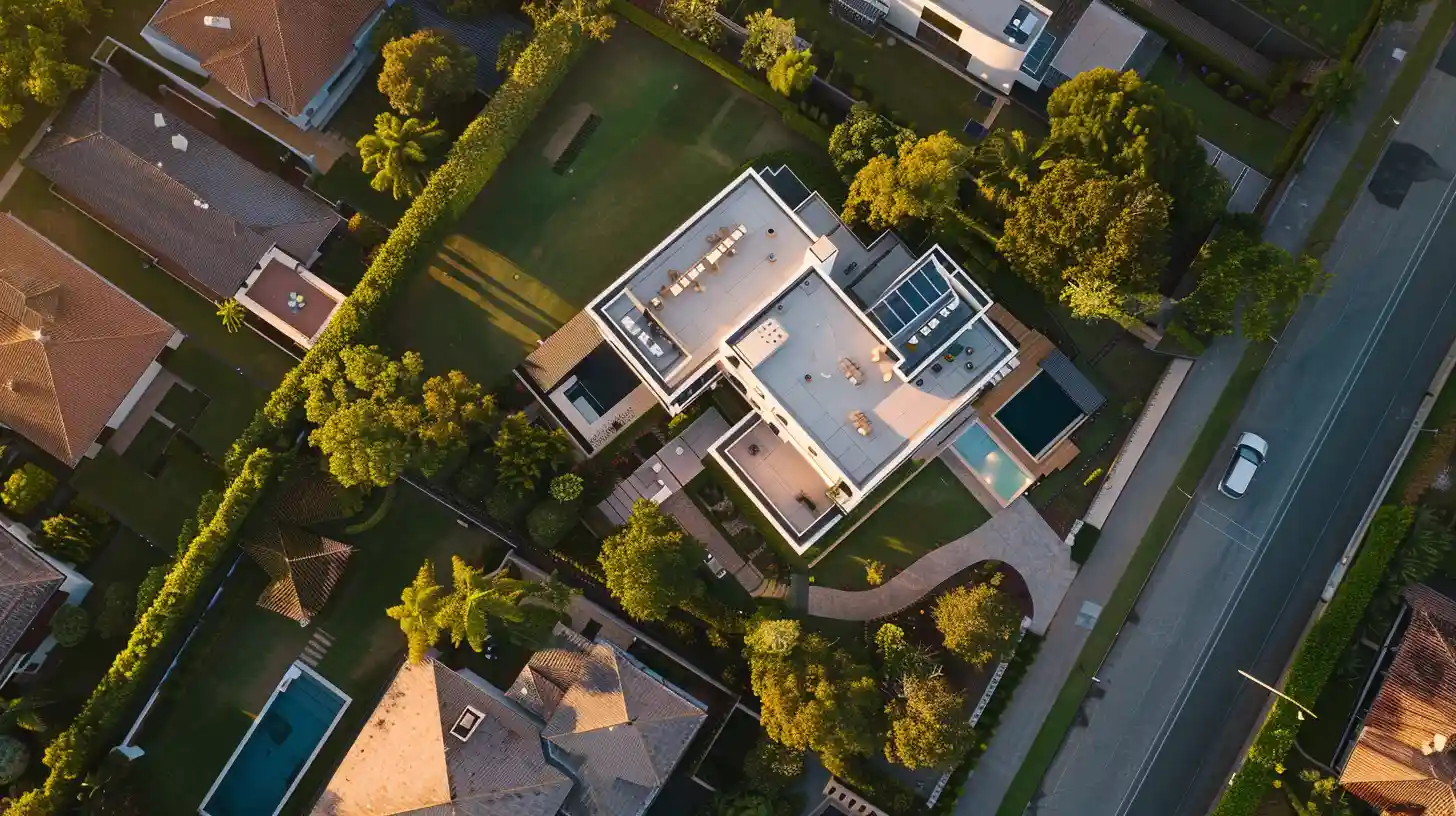
Buyers scroll past hundreds of listings per week. Ground-level photos all start to look the same after the first dozen. Aerial shots break that pattern instantly. They show the full property footprint, lot boundaries, proximity to parks or water, and neighborhood context that a wide-angle lens on a tripod simply cannot capture.
The National Association of Realtors reports that 73% of homeowners say they are more likely to list with an agent who uses drone photography. That number has climbed steadily since 2020, when it sat at just 56%. For real estate photographers, offering aerial services is no longer a premium upsell. It is becoming a baseline expectation.
Drone photos also perform well on social media. Aerial shots of waterfront properties, large acreage lots, and luxury homes consistently generate 2 to 3 times more engagement than ground-level images, based on data from real estate marketing platforms.
FAA Rules You Need to Know
Flying a drone for commercial real estate photography requires an FAA Part 107 Remote Pilot Certificate in the United States. The test costs $175 and covers airspace classifications, weather minimums, and operating limitations. Most people pass on the first attempt with two to three weeks of study.
The key rules for real estate shoots are straightforward. You must fly below 400 feet above ground level. You need to maintain visual line of sight with the drone at all times. Night operations are allowed with proper anti-collision lighting. And you cannot fly over people who are not directly participating in the operation without a waiver.
If you hire a drone pilot instead of flying yourself, make sure they hold a current Part 107 certificate. Ask for their certificate number. Liability insurance is not required by the FAA, but most professional pilots carry at least $1 million in coverage. Many MLSs and brokerages now require proof of insurance before accepting aerial photos.
In Canada, drone operators need a Transport Canada RPAS pilot certificate (Basic or Advanced) depending on the airspace and proximity to people. The rules differ slightly from the US, so check the specific requirements for your province.
Real Estate Drone Photography Costs in 2026
Costs depend on whether you fly yourself or hire a licensed pilot. Here is a realistic breakdown for both paths.
| Approach | Upfront Cost | Per-Shoot Cost | Best For |
|---|---|---|---|
| DIY (own drone) | $800 to $2,500 (drone + Part 107) | $0 to $20 (batteries, props) | Agents with 10+ listings/month |
| Hire a pilot | $0 | $150 to $350 per session | Occasional aerial needs |
| Photography company package | $0 | $200 to $500 (photos + video bundle) | Full-service convenience |
For agents who photograph their own listings, the DJI Mini 4 Pro ($760) or DJI Air 3 ($1,100) are the most popular choices. Both shoot 4K video, handle wind well, and weigh under 249 grams (the Mini 4 Pro) or just over it (the Air 3). The sub-250g weight class simplifies some regulatory requirements in certain jurisdictions. Check out our real estate photography pricing guide for a deeper look at the full cost picture, including ground-level photography.
Best Drones for Real Estate Photography in 2026
You do not need a $5,000 cinema drone to get great real estate aerials. The sweet spot sits between $700 and $1,500. Here are the three most popular models among real estate professionals right now.
The DJI Mini 4 Pro is the top pick for agents who want portability and simplicity. It weighs 249 grams, shoots 4K at 60fps, has a 1/1.3-inch CMOS sensor, and delivers 34 minutes of flight time. The obstacle sensing system covers all directions, which matters when you are flying near trees and rooflines.
The DJI Air 3 offers dual cameras (wide and telephoto) for more composition flexibility. The telephoto lens is excellent for shooting tight detail shots of rooflines, pools, and landscaping from a safe distance. It weighs 720 grams, so it falls under stricter Part 107 rules, but most professionals find the image quality worth it.
The DJI Mavic 3 Classic is the choice for photographers who want the best image quality in the consumer range. Its 4/3 CMOS Hasselblad camera produces files with noticeably more dynamic range and color accuracy than the smaller-sensor models. It is overkill for most agents, but photographers who sell aerial packages as a premium service will appreciate the output quality.
Turning Drone Photos into Listing Videos
Aerial photos are powerful on their own. Combined into a listing video, they become a complete marketing asset. The challenge has always been the editing step. Stitching drone shots with interior photos, adding music, inserting text overlays, and exporting at the right resolution takes time most agents do not have.
Amplifiles solves this by turning your listing photos (including drone shots) into a branded 1080p listing video automatically. Upload your aerial and interior photos, and the platform sequences them into a cinematic walkthrough with voice-over, captions, and your branding. The whole process takes about five minutes and costs $.50 per image. No editing software, no timeline scrubbing, no export settings.
Unlike general-purpose video makers such as Animoto or InVideo, Amplifiles is purpose-built for real estate. It understands the flow of a property tour: exterior establishing shots first, then room-by-room interiors, then back to outdoor living spaces. When you include drone photos, they automatically get placed as the hero opening sequence, which mirrors how professional videographers structure their edits.
For a step-by-step walkthrough of the process, see our guide on how to make a real estate video from photos.
Shooting Tips for Better Aerial Real Estate Photos
Getting the drone in the air is easy. Getting great shots takes a bit of planning. These tips come from photographers who shoot 20 or more properties per month.
Shoot during golden hour. The hour after sunrise and the hour before sunset gives you warm light, long soft shadows, and saturated skies. Midday flights are fine for documentation, but golden hour is what turns a listing photo into a hero shot. Check a sunrise app before booking the shoot and aim to be in the air 15 minutes before the window opens.
Fly at 80 to 150 feet for most residential properties. This altitude shows the full footprint of the house and lot without losing architectural detail. Go higher (200 to 300 feet) for acreage, estates, or when you want to emphasize location context. Anything above 400 feet breaks Part 107 rules unless you are flying near a structure and using the 400-foot offset exception.
Put the sun behind you. Shooting into the sun washes out colors, introduces lens flare, and underexposes the property. Plan your orbit so the drone circles with the sun at its back for the hero shots. If the property orientation makes that impossible, use HDR or AEB bracketing to recover the exposure in post.
Capture multiple angles, not just top-down. A 90-degree nadir shot is useful for showing lot lines, but buyers connect emotionally with low oblique angles. Shoot a 45-degree hero from the front of the property, an orbit from 30 feet above the roofline, and a pull-away reveal that ends with the full neighborhood in frame. The variety gives you hero images for MLS plus B-roll for your listing video.
Shoot in RAW (DNG) with auto-exposure bracketing. Consumer drones default to JPEG, which locks in exposure decisions you cannot easily fix later. Switch to RAW and turn on AEB (3 or 5 frames) for any shot with bright sky and shaded ground. You will get cleaner highlights and recoverable shadows when you edit.
Pre-flight every shoot. Check the weather (winds under 15 mph, no rain within 30 minutes), confirm you are not in restricted airspace with the B4UFLY app, and scout the property for power lines, tall trees, and homeowner pets or kids in the yard. Bring three batteries minimum. Most shoots eat through two, and you want a buffer for the shot you did not plan.
Frame the surroundings, not just the house. Buyers are not just buying a property, they are buying a neighborhood. If the home backs onto a park, show the park. If it is two blocks from the water, frame a shot that includes the waterfront. These context shots consistently outperform property-only aerials in click-through on portals like Zillow and Realtor.com.
Frequently Asked Questions
Do I need a license to fly a drone for real estate photos?
Yes. In the United States, any commercial drone operation requires an FAA Part 107 Remote Pilot Certificate. The exam costs $175 and most people pass with a few weeks of self-study. In Canada, you need a Transport Canada RPAS pilot certificate. Flying without the proper certificate can result in fines up to $32,666 per violation.
How much does real estate drone photography cost per listing?
If you hire a licensed drone pilot, expect to pay $150 to $350 per session for a standard residential property. Larger estates or commercial properties may run $400 to $600. If you own your own drone and have a Part 107 certificate, the marginal cost per shoot is essentially zero beyond battery wear and occasional propeller replacements.
What is the best drone for real estate photography?
The DJI Mini 4 Pro is the most popular choice among real estate agents for its portability and sub-250g weight. The DJI Air 3 is preferred by photographers who want dual-camera flexibility. Both produce excellent 4K aerial footage suitable for MLS listings and marketing videos.
Can I turn drone photos into a listing video?
Yes. Amplifiles is an AI-powered platform that converts your listing photos, including drone aerials, into a branded 1080p marketing video in about five minutes. It costs $.50 per image and includes voice-over, captions, and branding. No video editing skills required.
Is drone photography worth it for every listing?
Not necessarily. Drone photography adds the most value to properties with large lots, unique outdoor features, waterfront access, or scenic surroundings. For a standard condo or townhouse with no distinctive outdoor setting, ground-level photos and virtual staging may deliver better ROI. Focus your aerial budget on listings where the property's location and surroundings are a selling point.
Final Thoughts
Real estate drone photography has moved from luxury to expected. Buyers want to see the full picture before they schedule a showing, and aerial shots deliver context that ground-level photos cannot. The costs have dropped enough that any agent doing regular business can justify the investment, whether that means buying a $760 DJI Mini 4 Pro or budgeting $200 per listing for a hired pilot.
The real multiplier comes when you combine aerial photos with interior shots in a listing video. That is what turns a photo gallery into a marketing asset that works across MLS, social media, email, and your website simultaneously.
We built Amplifiles because creating listing videos from photos should take minutes, not hours. Our platform turns listing photos into professional 1080p marketing videos in about 5 minutes, with voice-overs, captions, and branding. No filming or editing required.