.webp)


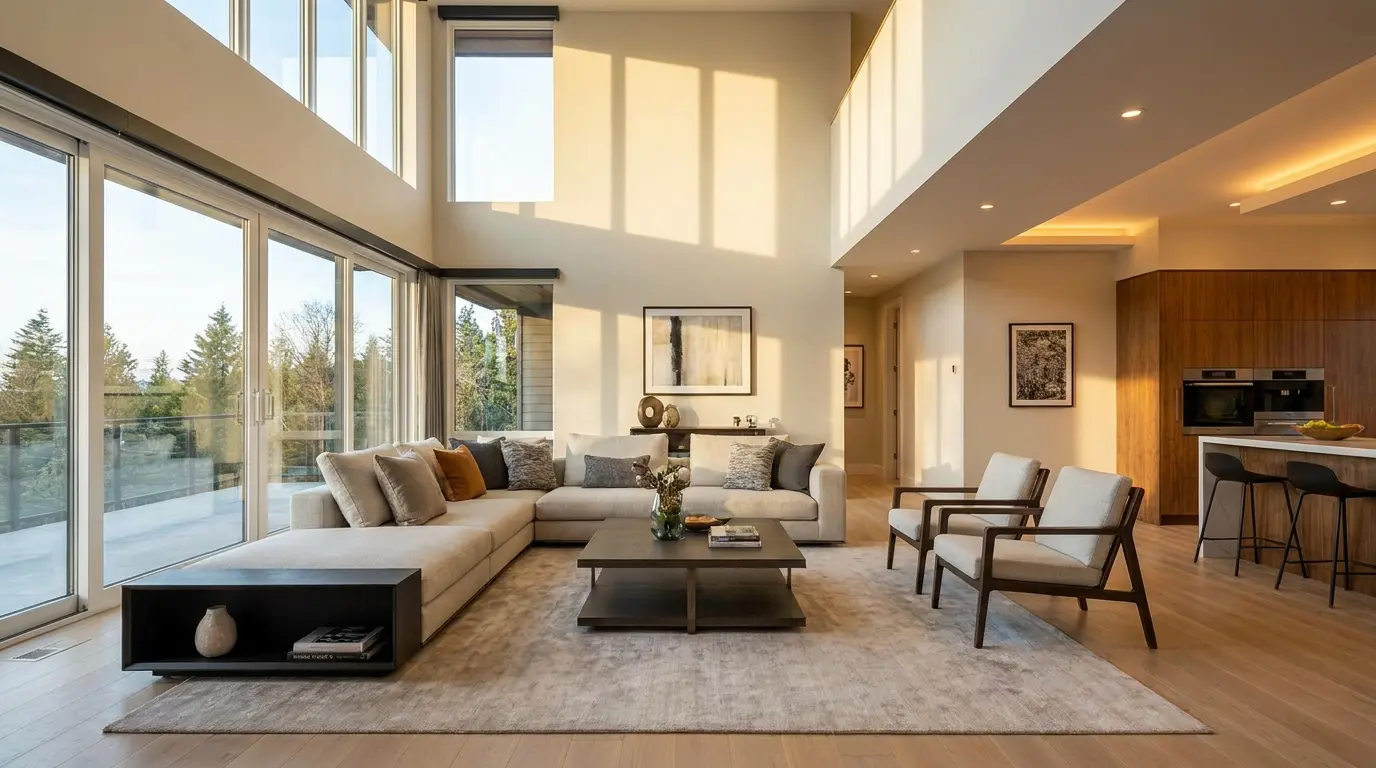
Flambient real estate photography blends two exposures of the same room, one lit by natural ambient light and one lit by flash, into a single image with accurate color and clean, visible windows. The flash layer neutralizes the orange and green color casts that mixed indoor lighting throws onto walls and ceilings, while the ambient layer keeps the shadows soft and the room looking like the room. The payoff over standard HDR is color you can trust. The cost is time, on the shoot and at the desk.
This guide is written for working real estate photographers and for agents who shoot their own listings. It covers how the technique works, the camera settings that hold up across most interiors, how to blend the layers in Photoshop, and the part most tutorials skip: deciding when the extra minutes per room are worth it, and how to turn those clean files into more revenue. If you are still choosing between blending methods, our HDR real estate photography guide covers the bracketing approach flambient competes with.
What flambient means
Flambient is a blend of two words, flash and ambient. It describes a shooting and editing method that combines a flash-lit frame with an available-light frame so the final image keeps the accurate color of flash and the natural mood of ambient light. The technique is popular for interiors because no single exposure handles a real room well. Shoot for the windows and the walls go dark. Shoot for the walls and the windows blow out. Flash fixes color but flattens the room. Ambient keeps depth but inherits whatever mixed lighting the house has. Flambient takes the best of each.
A typical flambient capture is two or three frames from a locked-down tripod position. One ambient frame records the room as the eye sees it. One flash frame, fired off camera and usually bounced off a ceiling or wall, lights the space with clean white light. An optional third frame, deliberately underexposed, captures a sharp view through the windows to mask in later. Those frames are stacked and blended in editing rather than merged by an automatic algorithm, which is exactly why flambient gives you more control than a one-click HDR merge.
Flambient vs HDR: the real tradeoff is time
The honest comparison is not about which technique is capable of a better photo. A skilled shooter can make either look good. The real difference is what each one costs you per room and where it tends to fail. HDR brackets the same scene at several exposures and merges them in software. It is fast, it needs no flash, and it struggles with color when a room mixes daylight, warm bulbs, and cool LEDs. Flambient adds a flash frame that resets the color, which is why interiors come out neutral and crisp, but it adds a step on location and a mask in post.
There is a real reason camera sensors need this help. A sensor captures roughly 10 to 14 stops of dynamic range, while the human eye perceives close to 20. That gap is what makes unprocessed interiors look flat or blown out, and it is the problem both HDR and flambient exist to solve. Flambient just closes the gap with light instead of leaning entirely on software.
Here is how the two stack up against single-exposure editing, the method many agents still use on a phone.
How to shoot flambient, step by step
The shooting routine is simple once it becomes muscle memory. The goal is two clean frames that line up perfectly, plus an optional window frame.
- Mount the camera on a tripod and frame the room from a corner at chest height. Lock the composition so nothing shifts between frames.
- Shoot the ambient frame first. Expose for the room with the windows slightly bright, letting the natural light set the mood.
- Switch to your flash settings and fire the flash frame. Bounce the flash off the ceiling or a side wall so the light is soft and even, not a hard blast from the front.
- If the windows show an important view, take one underexposed window pull frame to mask in later.
- Move to the next position. Most rooms need one to three positions depending on size.
One workflow note from photographers who shoot flambient at volume: standardize everything. Same flash power as a starting point, same aperture, same bounce direction. The less you change room to room, the faster the edit goes, because your blending steps stay identical.
Camera settings that hold up
Settings vary by room, but these starting points work for most interiors and give you predictable frames to blend.
For the ambient frame, set aperture between f/7.1 and f/8 for front-to-back sharpness, keep ISO between 100 and 400 to stay clean, and let shutter speed float until the histogram sits slightly to the right. You want the shadows open, not crushed.
For the flash frame, set shutter speed to your camera's flash sync speed, usually 1/160 or 1/200, which cuts most of the ambient light so the flash does the lighting. Keep the same aperture as the ambient frame. Adjust flash power until the room is evenly lit with natural-looking color, then leave it there. A flash like a Godox AD200 has more than enough power for residential interiors, and a speedlight works for smaller rooms.
Blending the layers in Photoshop
The edit is where flambient earns its reputation. The core blend takes three moves.
- Open the ambient and flash frames as two layers in the same document, with the ambient layer on top.
- Set the ambient layer blending mode to Luminosity. This applies the brightness and shadow shape of the ambient frame while keeping the accurate color from the flash frame underneath.
- Adjust the ambient layer opacity, usually somewhere between 50 and 100 percent, until the room balances between natural depth and flash cleanliness.
From there you mask in the window pull where needed, clean up flash reflections in mirrors or glass, and finish with your standard color and lens corrections. Photographers who do this daily save the steps as a Photoshop action so a finished blend takes a minute or two rather than ten.
When flambient is worth it, and when it isn't
This is the decision most guides avoid, and it is the one that actually affects your day. Flambient is slower than HDR, full stop. Reddit threads of working real estate photographers openly debate dropping it for HDR to save time. They are not wrong that it is more work. They are missing that the work is not always optional.
Flambient is worth the extra minutes when color accuracy carries the listing. Luxury interiors, twilight-adjacent rooms with heavy mixed lighting, dark spaces with no good natural light, and any property where the photos are the marketing all reward the cleaner result. Buyers and agents notice when a kitchen looks true to life instead of orange.
HDR or even a clean single exposure is fine when speed and volume win. A high-turnover rental, a quick price-drop refresh, or a property where the listing agent wants twenty rooms shot before noon does not justify a flash frame and a mask in every room. A good photographer matches the technique to the job rather than forcing one method onto every shoot. If you want the broader workflow context, our real estate photography tips cover the shoot end to end, and the Amplifiles guide for photographers covers what to do with the files after.
Turn your flambient photos into a listing video
Here is the part that turns a slow technique into a paid one. The reason you shoot flambient is clean, color-accurate, evenly lit stills. Those are exactly the files that make a listing video look premium, because a video inherits the color and lighting of the photos it is built from. Garbage stills make garbage video. Flambient stills make video that looks like it came from a production crew.
That is the upsell most photographers leave on the table. Once your set is edited, Amplifiles turns a finished set of flambient listing photos into a branded 1080p listing video in about five minutes at $1.50 per image (one dollar and fifty cents per image), so photographers can add video to a photo package without filming or editing. New accounts get 1,200 free credits, which is roughly eight processed images, enough to test the workflow on a real set before charging for it.
Generic video makers like Animoto can stitch photos together, but Amplifiles is purpose-built for real estate listings, with voice-over, captions, branding, and motion designed for property walkthroughs rather than slideshows. You can see real estate video examples before you make one, or compare the math on the pricing page against what a videographer charges per listing.
Frequently Asked Questions
What is flambient real estate photography?
Flambient real estate photography is a technique that blends a natural-light ambient exposure with a flash exposure of the same room into one image. The flash corrects the color casts from mixed indoor lighting, and the ambient frame preserves natural shadows and mood. The result is brighter, more color-accurate interiors than a single exposure or standard HDR usually produces.
What does flambient mean?
Flambient is a combination of the words flash and ambient. It describes the practice of combining a flash-lit photo with an ambient, or available light, photo so the final image keeps the accurate color of flash and the natural look of ambient light.
Is flambient better than HDR?
Flambient usually wins on color accuracy because flash neutralizes mixed lighting that HDR cannot fix on its own. HDR is faster to shoot and edit because it relies on bracketing alone with no flash to balance. Many photographers shoot flambient for high-value listings and fall back to HDR when speed matters more than perfect color.
How long does flambient take per room?
A practiced photographer spends roughly two to four minutes per room on the shoot and a few minutes per image in editing, which is noticeably longer than bracketed HDR. The extra time comes from firing a separate flash frame and masking the layers in post. Volume shooters standardize their settings and editing actions to keep this manageable.
Do I need off-camera flash for flambient?
You need at least one flash strong enough to light a room, such as a Godox AD200 or a speedlight, plus a wireless trigger and a tripod. Off-camera flash bounced off a ceiling or wall gives softer, more even light than on-camera flash. A tripod is essential so the ambient and flash frames line up perfectly for blending.
Can I turn flambient photos into a listing video?
Yes. Once your flambient set is edited and color-accurate, a tool like Amplifiles turns the photos into a branded 1080p or 4K listing video in about five minutes at $1.50 per image (one dollar and fifty cents per image). Color-accurate stills are the ideal input because the video inherits the clean color and even lighting of the originals.
Final Thoughts
Flambient is not the right tool for every shoot, and that is the point. It is the technique you reach for when color accuracy sells the property, and you keep HDR or a fast single exposure for the jobs where speed wins. Knowing which is which is what separates a photographer who charges for quality from one who just shoots fast.
We built Amplifiles because clean listing photos deserve a second life as video, and most photographers never get paid for that step. Our platform turns listing photos into professional 1080p marketing videos in about five minutes, with voice-overs, captions, and branding. No filming or editing required.
Browse real estate video examples to see what a delivered listing video looks like before creating one. Or see how Amplifiles works for photographers and start with your 1,200 free credits.